Comprehensive Buttoneer Review
Who has time to sew on buttons? With thread? And a needle?! That’s far too hard! Why not use a button gun to attach it instead? In this post, I’ll review both versions of the vintage Buttoneer, go over how to find replacement fasteners for the vintage Buttoneer, and examine how it compares to the modern Buttoneer.
Disclosure: This post contains affiliate links, which means I may receive a percentage if you make a purchase using these links. This won’t cost anything extra to you. See my privacy policy for more details.
Buttoneer History
To start with a little history, the Buttoneer came out in the 1970s and different versions of it have existed ever since, although the newest iteration has fairly poor reviews.
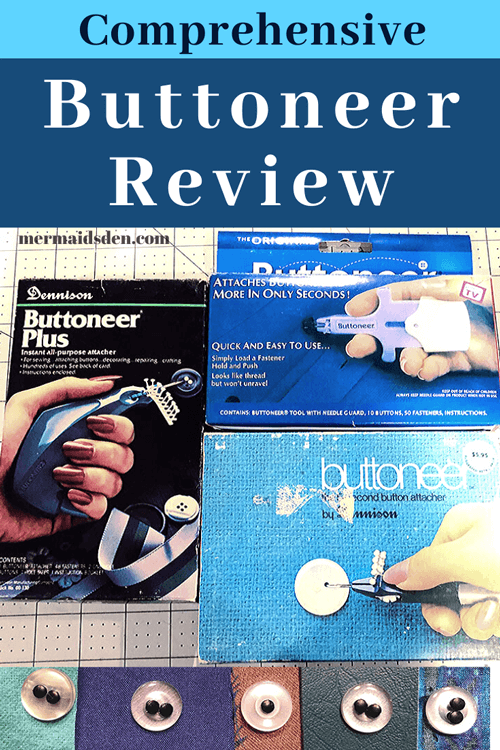
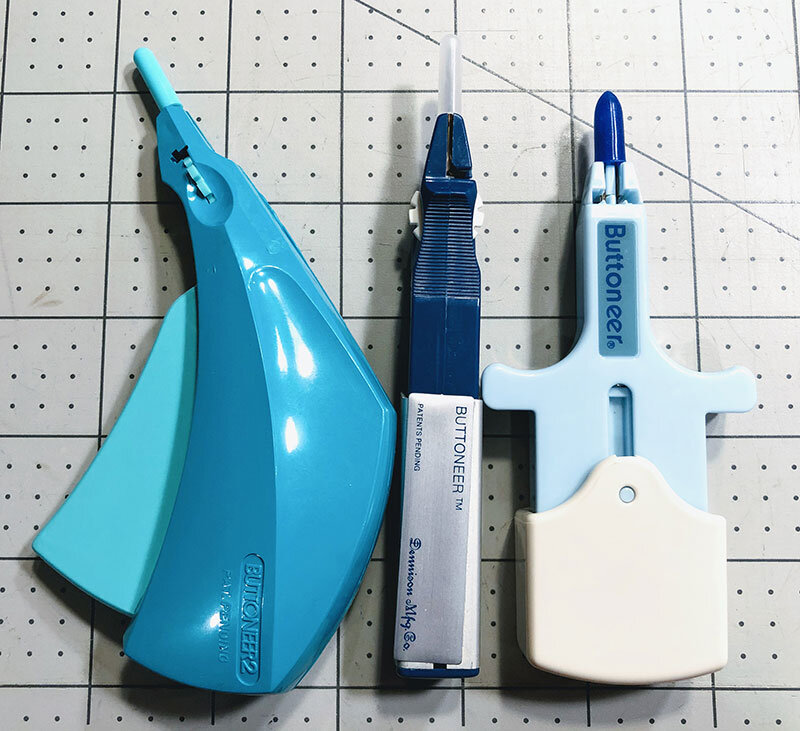
I have three Buttoneers to review here: the original version from the early 70s (center), the Buttoneer 2 (or Buttoneer Plus) version from the late 70s or early 80s (left), and a modern Buttoneer that is still in production today (right), although most online reviewers don’t seem to like it as much as the vintage versions.
Comprehensive Buttoneer Review
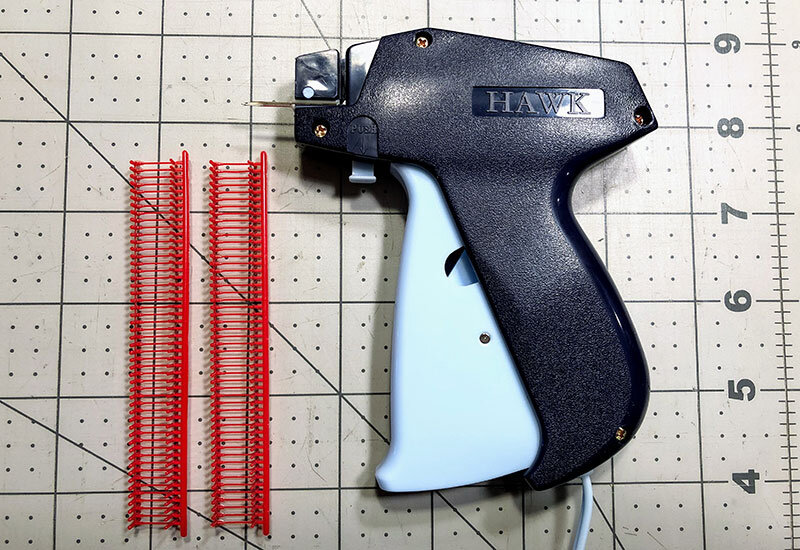
If you’re looking at the Buttoneer and thinking that it looks kind of familiar, you’re right. If you’ve ever worked in retail, you might be familiar with a price tag gun. The company that makes the Buttoneer, Avery Dennison, also makes price tag guns. The Buttoneer is basically a repackaged price tag gun with slightly different fasteners.
Comprehensive Buttoneer Review
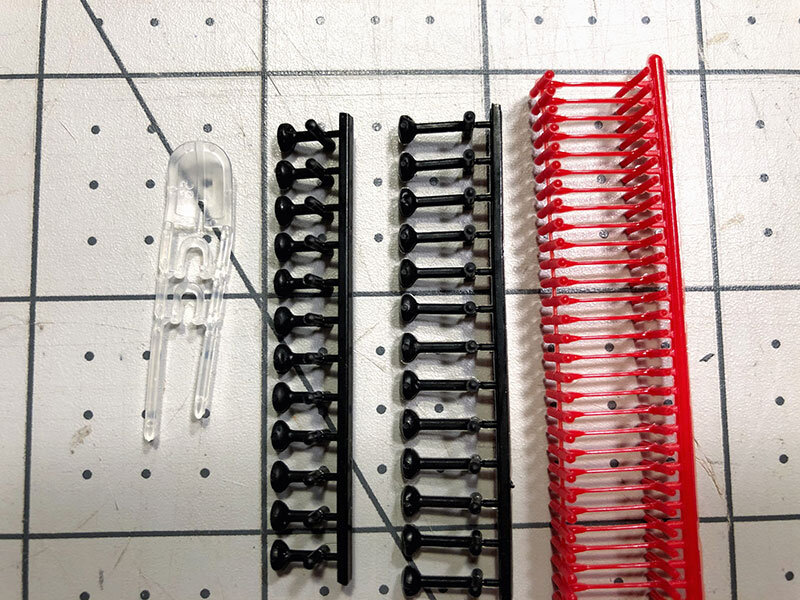
The new Buttoneer has two prongs and the fasteners are horseshoe-shaped (far left). The older Buttoneers have one prong and the fasteners are connected in a row (middle two), much like they do with a price tag gun (far right). The plastic fasteners on the Buttoneer are just long enough to hold on a button securely, rather than being long enough to let a price tag dangle freely from a piece of clothing.
Comprehensive Buttoneer Review
Vintage Ronco/Dennison Buttoneers
Before I got one, I had seen the Buttoneer floating around online, and I’d been curious about it, but they cost more than I wanted to spend for a novelty sewing gadget, and I was hoping to find one at a local store for cheap. I finally found one for a dollar, which was perfect, and I was really excited to try it out.
But...when I pulled the little plastic fasteners out, they were crumbling apart. I could barely even pick them up without having them fall to bits.
Comprehensive Buttoneer Review
My curiosity was piqued, though, and I needed to see how this thing worked, so I bought another one on Ebay with a slightly different design called the Buttoneer 2 or Buttoneer Plus, but it still had a single prong and used the price-tag style fasteners. This time, I paid around $10 and it even came with extra fasteners in different colors.

Comprehensive Buttoneer Review
Unfortunately, this one had the same problem! The fasteners were all crumbling to pieces. I couldn’t find a single one that held up. So I started to look for modern refills that would fit the vintage Buttoneers.
I looked on Amazon, and there were some blurry photos of Buttoneer refills that claimed to be for the original Buttoneer, but the reviews were mixed, with a lot of people saying that these did not fit the vintage Buttoneer. Honestly, it’s hard to tell from the photo, but I think these are the horseshoe-shaped fasteners for the two-pronged Buttoneer.
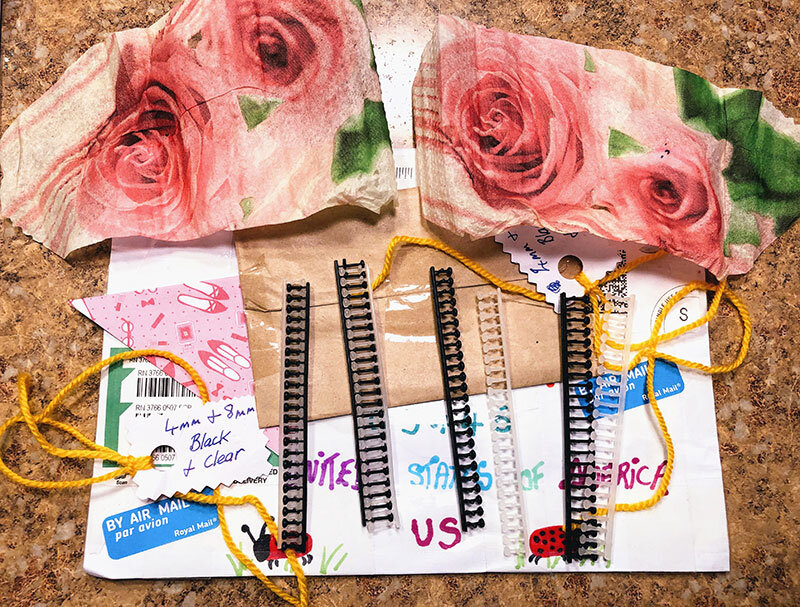
So I went back to Ebay and I found a seller in the UK who had proper refills that would fit the older, one-prong Buttoneer. These refills are brand new and the seller specified that they were not crumbly like the vintage ones.
Initially, I didn’t want to spend a lot of money on this gadget, but now I had two Buttoneers and no way to test them out! So I ordered my refills, and since I was buying them from overseas, I figured I might as well stock up. I spent about $20 getting non-crumbly fasteners. I got a mix of 4mm and 8mm fasteners in white and black. There were more options for different colors and sizes when the old Buttoneers were still in production, but these seem to be the only options now.
They came in a very cheerfully wrapped package in a colorfully addressed envelope with some hand-drawn ladybugs on it!
Comprehensive Buttoneer Review
My $1 find led me down a rabbithole of increasingly expensive purchases, but finally, I was able to test out my Buttoneers and see how useful they were.
How to Use a Buttoneer
Since you might be familiar with a price tag gun already, I’ll show you how it’s similar to and different from the design of the Buttoneer. You load up your plastic fasteners, put the needle through your fabric, hold it against the fabric, and compress the button on the handle, which pushes the tag through the fabric. See the video below for more information on how price tag guns work.
The Buttoneer works much in the same way, only the fasteners are oriented slightly differently. See the video below for more information on how to insert the fasteners.
Basically, you just turn the wheel to advance your fastener into position, slide the button onto your needle, push it through the fabric, hold it fairly taut against the fabric, and push the fastener through. It takes a little bit of practice to get this right; you can’t hold it too tight, but you also can’t hold it too loose. See the video below for more information on how to use the Buttoneer.
Sometimes it will misfire and the fastener won’t go through the fabric. That’s okay. You can reload that fastener and try again. I was worried about this at first because I didn’t want to waste any of my expensive fasteners, but your fastener is still fully functional, even when detached from the rest of the bunch. See the video below for more information on how to use a detached fastener.
For me, the vintage Buttoneer that’s similar to a price tag gun is easier to use. The other one has to be scrunched up from the bottom, which feels more awkward to me. Neither one is hard to use, but I like the gun-style Buttoneer best.
The Modern Buttoneer
Now, at this point, I started to get curious about whether the vintage Buttoneers really were so much better than the new Buttoneer. So even though the modern Buttoneer has an average score of 1.8 stars on Amazon, and 64% of reviewers gave it one star, I felt like I had to get one in order to give you a comprehensive review of the Buttoneer.
This one works similarly to the previous two, except the fasteners are loaded from the top. Once you put them through, you want to pull down on the little legs at the bottom to make sure everything is aligned correctly. Then place your button on the needles, insert into the fabric, hold it taut against the fabric, and push it through. See the videos below for more information on how to use the mdoern Buttoneer.
When I first took it out of the package and tried it out, I thought I was going to have a stunning revelation for you about how the modern Buttoneer isn’t as bad as most people think it is. However, after using it more extensively and testing it on different fabrics and different buttons, I unfortunately have to agree with the majority of reviewers.
Initially, it seemed a little smoother than the vintage Buttoneers, which needed a little finagling to get the fastener through. However, the t-shaped part on the back of the fastener is much smaller on the modern Buttoneer, and if you’re using it on a fabric with a looser weave, it just slips through. I do like the look of the modern Buttoneer’s fastener better than the vintage Buttoneer’s fastener. Since it’s only one piece, though, the button is not quite a sturdily attached as it would be with two separate fasteners holding it on.
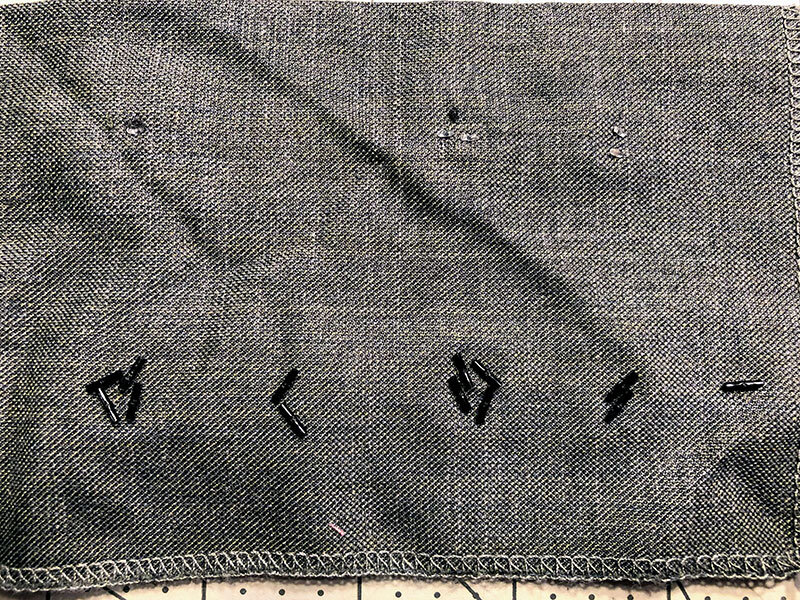
Below, the top row shows the small clear plastic “legs” of the modern Buttoneer fasteners from the back of the fabric. The bottom row shows the vintage-style fasteners in black.
Comprehensive Buttoneer Review
You can only attach certain kinds of two-hole buttons as well. The needles are not flexible enough to accommodate particularly small or large buttons. The modern Buttoneer also misfires more often than the vintage one, and once the fastener has been removed from the plastic frame, it’s not usable anymore. Some of the fasteners came twisted or otherwise nonfunctional. Some wouldn’t detach from the plastic legs. I’d say that half of the fasteners I tried were not usable.

Comprehensive Buttoneer Review
So although the modern Buttoneer is more convenient to get, and you can still buy replacement fasteners for it, I would not recommend it. It’s more frustrating than useful. If you have a medium-sized two-hole button to reattach to a lightweight, tightly woven fabric, it might work okay.
Washing and Ironing
All of the Buttoneers claim that buttons attached with them can go through the wash. I decided to test this out with a few different types of buttons. The vintage Buttoneers came with some fancy one-hole buttons, so I included one of those. The modern Buttoneer can’t handle a one-hole button, nor could it attach something like sequins, which the vintage Buttoneer touts as one of its uses.
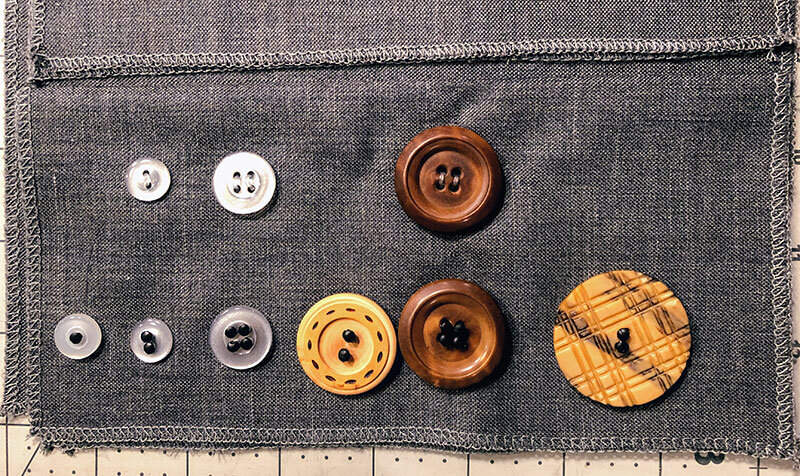
On this test piece, the vintage fasteners were much more versatile (bottom row below). The vintage Buttoneer can be used on buttons with wider-spaced holes and on thicker buttons. The modern Buttoneer can handle most standard 2 or 4 hole buttons, but it has trouble with anything slightly out of the norm (top row below). I’ve attached these to two layers of a lightweight apparel fabric, and they all stayed on while going through a full wash and dry cycle. I’m not sure how they’d hold up to multiple washings, but they didn’t have any trouble going through the wash once.
Comprehensive Buttoneer Review
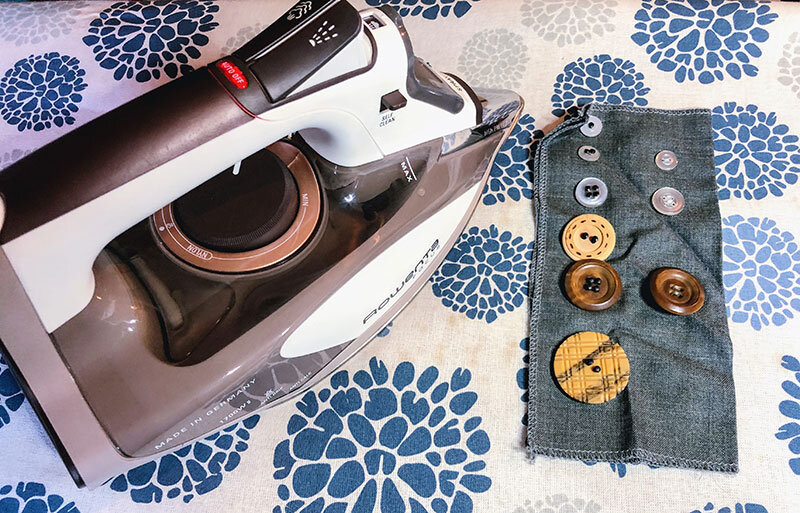
The modern Buttoneer says its fasteners can withstand ironing, but the instructions on the vintage Buttoneer say not to iron the fasteners because they might melt. Now, you probably wouldn’t iron over the buttons on a regular piece of clothing, but I decided to place my iron right on the fasteners, both on the front and back of the piece. I used a medium heat setting between cotton and wool, and I passed over both sides multiple times. None of the fasteners melted. You might notice that the fabric is still a little wrinkled, but that’s because it’s hard to get in between the buttons.
Comprehensive Buttoneer Review
The Final Verdict
So which one is best? If you buy a vintage Buttoneer, you will almost certainly have to buy some of the more expensive, new fasteners, and I could only find one person who sold them. But the fasteners are more solid than the modern Buttoneer’s, and they’re a little more versatile in that you could also use them to attach sequins or for other decorative purposes. There are also two sizes that you can get and two colors.
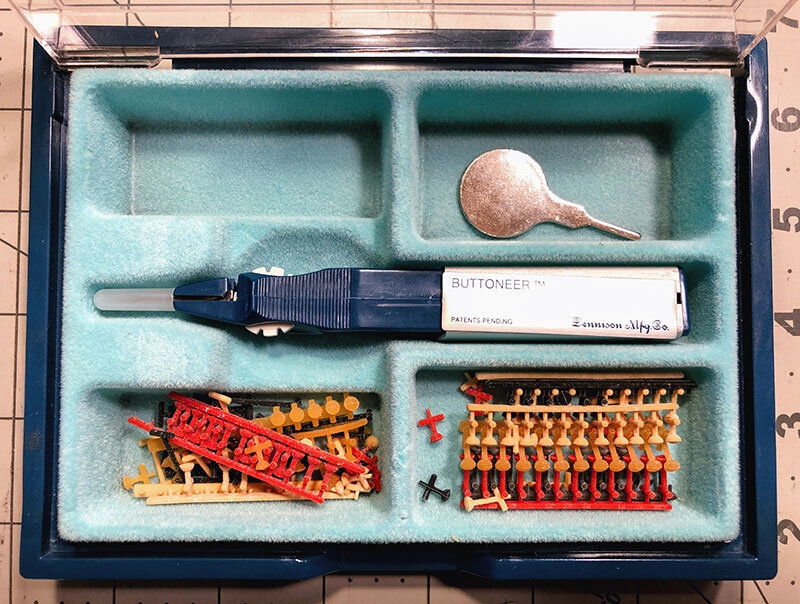
Between the two vintage Buttoneers, I like the hard plastic case that comes with the older version of the Buttoneer, along with a button-hole sizer, some one-hole buttons, and extra fasteners, which will likely be too fragile to use. However, I don’t like the design of this Buttoneer as much as the gun-shaped version. I think it’s a little harder to use.
The Buttoneer Plus came in a flimsier case, but it should have all of the same accessories as the older version. Mine doesn’t have the one-hole buttons, instruction booklet, or button-hole sizer, so look for a version that has everything if you’re buying this online and it’s going to be your only Buttoneer. I like how they’ve talked up its uses on the Buttoneer Plus. On the original Buttoneer, it says that it has “dozens of exciting uses,” but on the Buttoneer Plus, it has increased to “hundreds of uses.” I feel like they might be overselling it just a bit!
The modern Buttoneer is still in production, making it easier to find at a store, rather than having to search Ebay or a secondhand shop, and the fasteners are still easy to get, relatively cheap, and sold multiple places online. The fasteners more closely mimic the look of a hand-sewn button, though the fasteners are less substantial.
If you need to attach a button really quickly or just feel lazy about sewing, the Buttoneer could be a good tool to have, but sewing on a button is probably the best way to secure it. I actually don’t mind sewing on buttons by hand, and I also have a post about sewing on a button with your sewing machine as well as a post on the history of buttons, but I also just like sewing gadgets, so I’m glad I was able to get my Buttoneers working and test out the modern Buttoneer.
How to Purchase the Buttoneer
You can get vintage Buttoneers on Ebay. I’m linking to a search page that looks for the words “Dennison Buttoneer,” and you can take your pick of them.
To get fasteners, check out seller 22donna0. I’m going to link to her listing for fasteners, too, but sometimes those get taken down or refreshed, so check out all of her listings if you can’t find anything under that particular link.
You can get the modern Buttoneer on Amazon if you really want to, but I wouldn’t recommend it.
Similar Tools
My Buttoneer rabbithole also led me to the AMRAM Quilting Quilter's Quilt Basting Gun Kit, which I’ve also shown in this post. This quilting gun is essentially a price tag gun repackaged for quilters. However, the fasteners are very slim and don’t leave a hole that is much bigger than what you’d get from using pins or safety pins to hold your quilt together.
I’ve posted about quilting before and about using fusible batting. I have a lot of trouble keeping my layers from shifting while I’m quilting, so I was really hoping that the fusible batting would hold better than it did. It wasn’t bad, but it still shifted a bit more than I would have liked, especially on a large project like a quilt, so I’m planning to try out this quilt basting gun next time I make a quilt. Let me know if you’re interested in this gadget, and I’ll bump it up in my blog project queue!