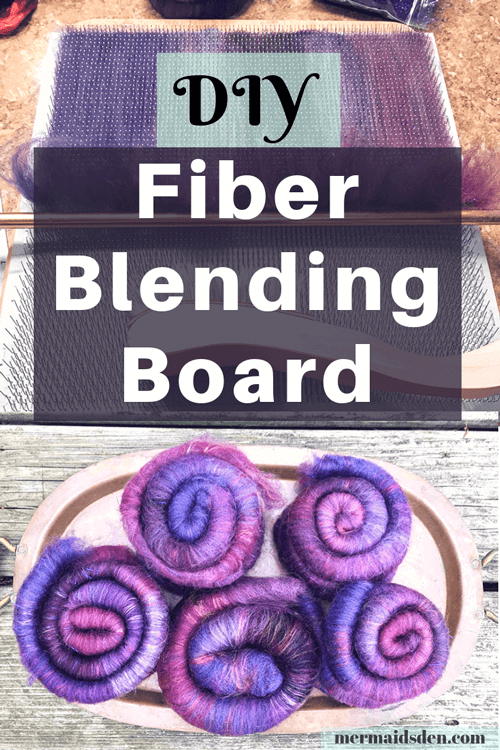
DIY Fiber Blending Board

In this post, I’ll show you how to make your own blending board for spinning fibers. You can make your own rolags with this blending board. You can also pull your own combed top or roving off of the board, so you have a long, continuous length of fiber from which to spin.
I started spinning recently, and I realized that I’d like to process and blend some of my own fibers for it. I saw some cool tutorials on Youtube for how to use a blending board, and I immediately wanted one. I was surprised at how expensive they are, though! They all seem to be a couple hundred bucks. I made mine for around $40, which I think is much more reasonable.
Disclosure: This post contains affiliate links, which means I may receive a percentage if you make a purchase using these links. This won’t cost anything extra to you. See my privacy policy for more details.
Materials Used
- Board: I used an old cutting board. You could find one at a thrift shop or just buy a board at a home improvement store.
- Blending board fabric: I got mine from Howard Brush Outlet on Etsy. It’s 12” x 12”. Their inventory changes all the time, but I bought fabric that was for blending fine fibers at 90 tpi (or teeth per inch). See this article for a good overview of tpi and when you'd want to use different densities of tpi. Seventy-two is often recommended as a happy medium for handling both coarser and finer fibers, but when I bought my blending board fabric, that tpi wasn’t available, so I went with 90 instead. It has worked out fine for me, as I like to use a lot of Merino, which is pretty fine.
- Blending brush: Again, I got a factory second from Howard Brush Outlet on Etsy. I bought a fine blending brush, since I got fine blending board fabric. There's also a standard blending brush. You can use almost any brush for this, though, and I've seen people use paint brushes, hair brushes, and pet brushes to help pack in the fibers on the blending board.
- Staple gun, and staples, and staple remover, just in case you misplace any of your staples.
- Dowels or knitting needles: if you don’t have any lying around, you can find some at a thrift store or yard sale pretty easily. Or you can buy some dowels from a home improvement store—they’re not too expensive.
- C-clamps: I used these to clamp the blending board onto the table.
- Merino wool roving: I used this package of five different shades of purple combed top.
- Angelina: this is a sparkly, acrylic fiber.
- Tencel: this is a shiny, silky fiber made from wood pulp.
How to Make A Blending Board
Here are my supplies for making the blending board. I used my staple gun, blending board fiber, and cutting board.

When I first ordered it, I wasn’t sure if the tines on the blending board fabric were straight or curved. It turns out that they’re curved, much like hand carders.

Here’s what the back of the fabric looks like. If you needed to remove some of the tines to alter the shape of the blending board, I think you could use a staple remover to pull out some of them.

I used my staple gun to staple the blending board fabric onto the cutting board. I used 1/4” staples. I tried using a longer staple, but I had trouble getting it to embed itself fully in the board. You don’t want your staples sticking up and catching on things.

The cutting board curved in a bit at the top and bottom, so I couldn’t fit staples at these spots, but the rest of the staples seem to be holding it on pretty sturdily. I tried to put a couple of staples in, but they caught on the edge of the board, so I had to use my staple remover to pull them out.

Here’s what my finished blending board looks like:

How to Use a Blending Board
Here are a couple of excellent tutorials from Blue Mountain Handcrafts on making rolags on a blending board and making continuous roving on a blending board.
Here’s a quick overview of how I’ve used the blending board so far. I’ve got all of my supplies gathered here. I’ve got five different colors of purple Merino wool, sparkly purple Angelina fibers, and tencel fibers.

Put your tencel or other sparkly fibers on the board first. These will now be on the outside of the rolag when you roll it off the board, which will look nice and allow you to more easily draft them when you’re spinning.

Then layer your main fibers. I’ve added my different colors of Merino in stripes on the board, but you can lay down your fibers in any way that looks good.

Once your board is full, catch the edges of the fiber that are protruding off the board between your knitting needles or dowels. Slowly roll the fiber off the board, pulling it back every couple of turns to draft it out. You can roll the entire board to make a big rolag or roll 3-4 smaller rolags.

Here’s a smaller rolag that I pulled off the blending board. Pull out your knitting needles, and your rolag is ready to go.

Here’s the finished rolag.

Use the blending brush to loosen a couple of inches of fiber so that you can get your knitting needles underneath it to start a new rolag, then roll it off the board in the same way.

At first, I struggled to draft the fibers off the board because the board kept lifting up, so I used some C-clamps to hold it down, which made drafting the rolags much easier.

The Finished Rolags
Here are all of the rolags that I made from 2.5 oz of Merino wool, some tencel, and some angelina. I was surprised by how many I was able to create!

The first batch I made was a little messy.

But this batch looks much better. As I got used to the process of rolling and drafting the rolags from the blending board, it was easier to roll them neatly.

Initially, I made four rolags out of each full blending board, but I switched to three later on. Some of the rolags were a bit thin when I made four, but they all have a decent amount of fiber when I make three.

I recently made these rolags. The bigger logs are from rolling up the entire board, rather than breaking it up into smaller sections. I dyed my own fiber for this batch using food dyes. I’ll write a post about that in the near future. Overall, I like the colors and saturation that I got. I haven’t spun these up yet, but I’m excited to get to them!

The Finished Yarn
To spin from rolags, you can just pull a bit of fiber out of the end and start drafting. See this helpful tutorial from Grace Salom Hopkins.
It’s not too had to get used to spinning from rolags. Some of them were smoother to spin from, while others were a little chunkier, depending on the mix of fibers.
Here’s the finished two ply yarn that I made from the purple rolags. I plied it with some purple rayon thread, which gives it a bit of shimmer but lets the merino blend be the star of the show. It also gives you a bit more yardage than you’d get if you plied it with itself.

Want more Fiber Arts Projects?
See my Pinterest board on Spinning Yarn:
Want some projects to make with your handspun yarn? See these easy one skein knitting patterns from All Free Knitting.