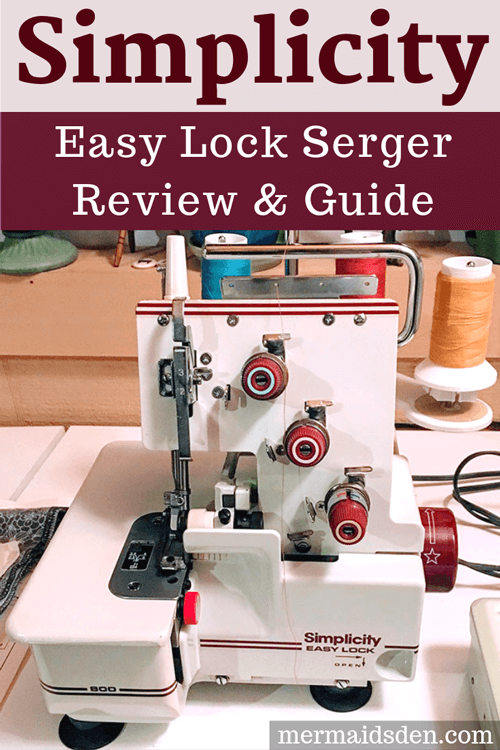
Simplicity Easy Lock Serger SL800
In this post, I’ll show you how to clean, oil, troubleshoot, repair, and use a vintage Simplicity Easy Lock Serger SL800. I’ve seen vintage sergers in other people’s collections, and I always felt a little jealous, but I had never come across one until recently, and then I found two in a row! While I have a modern serger, many people swear by vintage sergers, which were built to last, with all metal parts, as opposed to the plastic used in and on most modern sergers. I paid $5 for this one, which is much cheaper than the hundreds you’ll pay for a brand new serger.
Disclosure: This post contains affiliate links, which means I may receive a percentage if you make a purchase using these links. This won’t cost anything extra to you. See my privacy policy for more details.
Background Information & History
Here’s everything mine came with. It came with the original pedal and manual, which was helpful. The manual noted that there would have been an accessories case in the left-hand panel underneath the machine, but it’s missing on mine.
From what the manual says, the accessory box would have included nets to put over your cones of thread, adapters to hold regular spools of thread, tweezers, and a tool to help with threading. Useful, but not absolutely necessary.
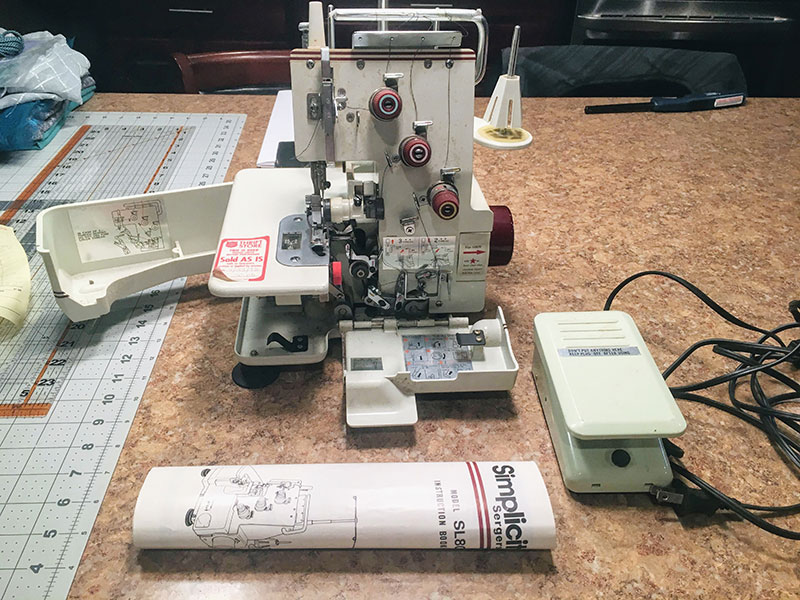
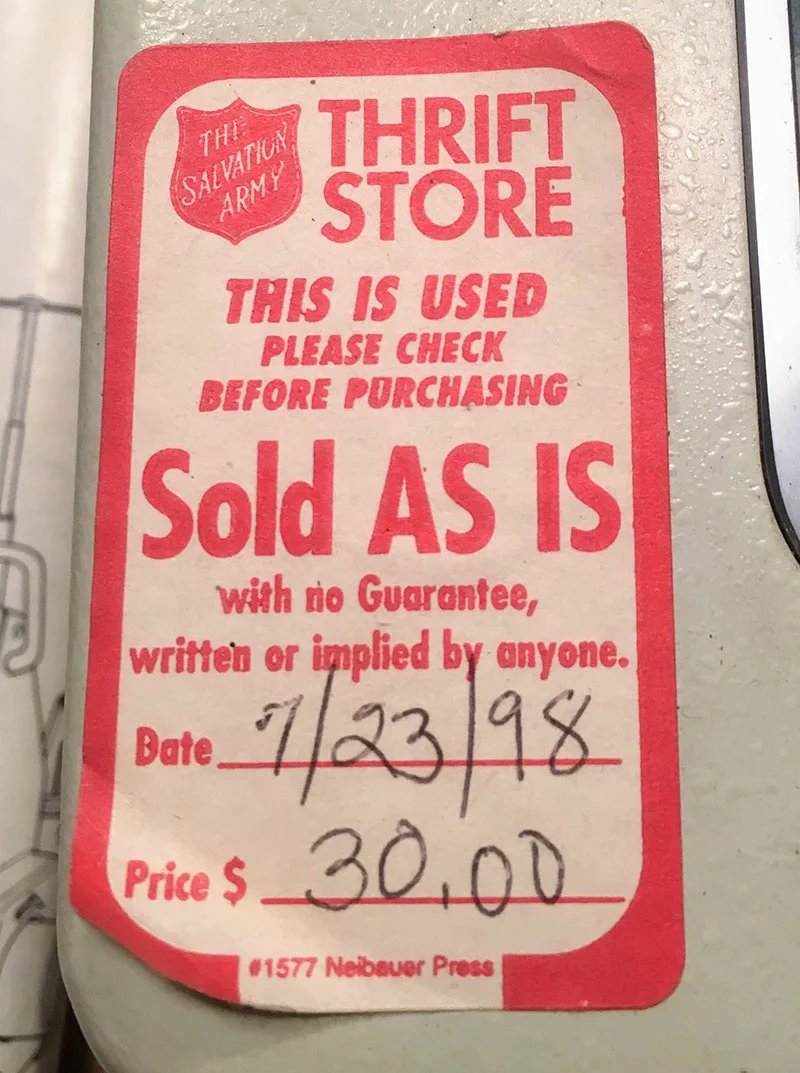
I couldn’t find a date on this machine anywhere, but at some point in 1998, this machine was sold at a Salvation Army for $30 because it still had this sticker. Given the color palette of the machine, I would guess that it’s from the 80s, but it could be from the early 90s as well.
There’s a discussion thread on the Simplicity Easylock SL800 over at Pattern Review that goes over some of its features. The consensus is that it does really nice rolled hems, better than just about any other serger. Someone noted that it's made by Tacony, which is "a very reputable company that has always had exclusive distribution of Babylock."
I thought that was interesting because when I looked for compatible replacement parts, nearly all of them were from Babylock. I’ve never had a Babylock sewing machine, but I’ve heard good things about them. If these Simplicity sergers were made by the same company, that explains why people like them so much.
Cleaning
Before using it for the first time, you’ll want to clean and oil your serger. Mine was quite dirty on the outside, and the inside was filled with fuzz and dust. Sergers get gunked up more easily than sewing machines because they have a blade that cuts the fabric as you stitch, so lint and dust build up quickly.
I really like the fact that there are two doors that allow access underneath the serger. Cleaning it is much easier that way! I like to use mini vacuum attachments to clean my serger. It’s much faster and cleaner than using a little brush.

The nice thing about this serger is that it has instructions printed on stickers placed strategically around the machine. The sticker over the thread guides shows how to go from using three threads to two. The sticker on the front door of the machine, which is a little cut off, shows how to switch from regular overlock stitch to rolled hems. The thread guides for the upper and lower looper threads are color-coded with yellow and pink, which is also nice.

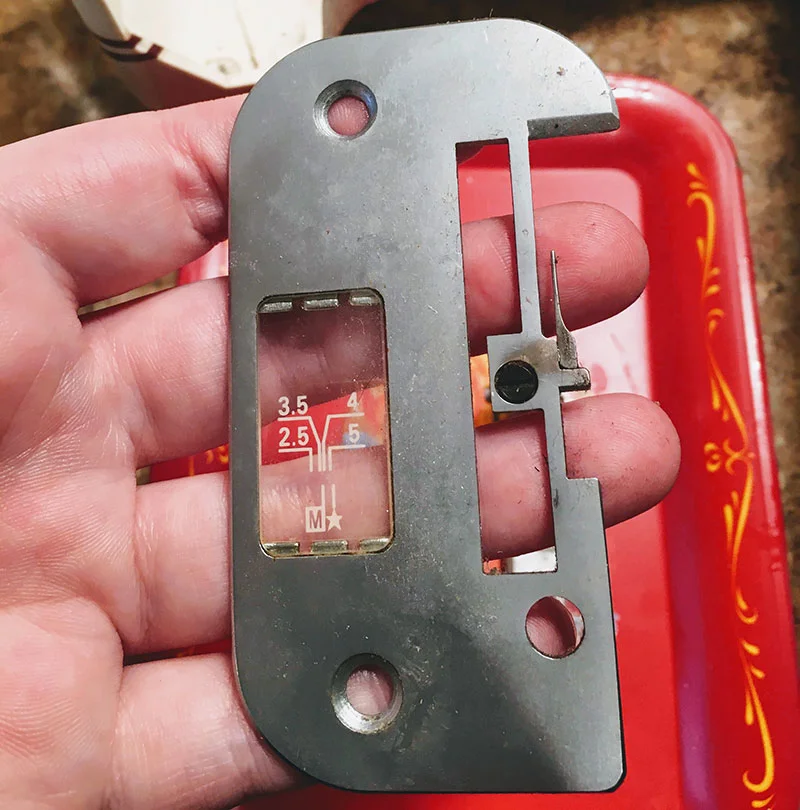
You’ll want to remove the needle, presser foot, and needle plate in order to clean everything thoroughly. There are two screws holding the needle plate on at the front and back. There’s another hole in front of the feed dogs, but on my serger, there’s nothing in that hole—it’s just a hole. Is it supposed to be like that? I’m not sure, but it doesn’t seem to impede the function of the machine.
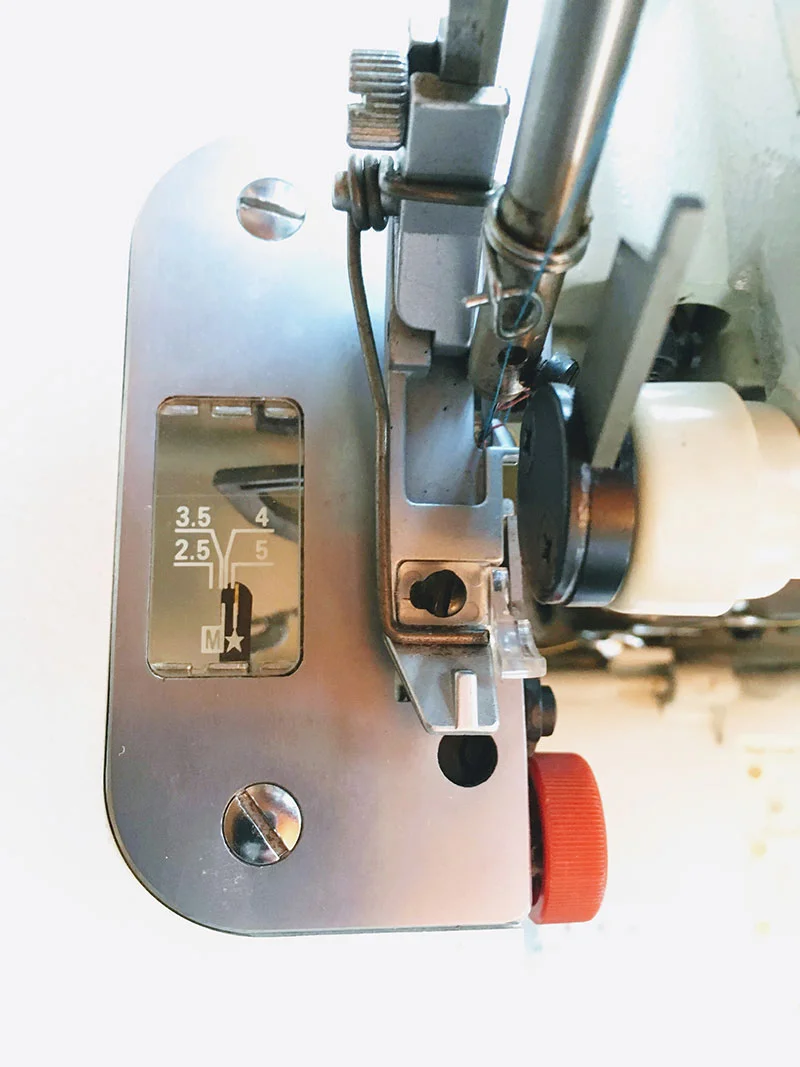
You can also see that there’s a clear plastic section in the middle of the needle plate, which is kind of fun. When the needle plate is on the machine, the stitch width indicator will line up with this, and you can choose your stitch width. More on that later in the post.
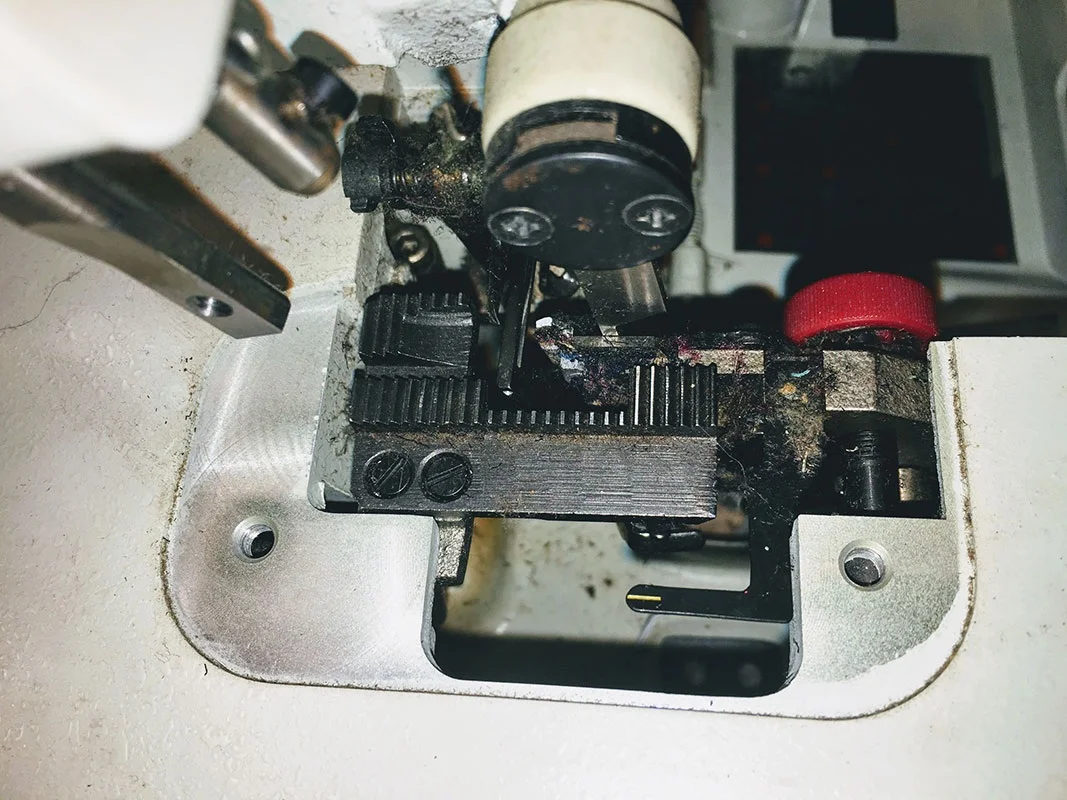
Here’s what it looks like underneath the needle plate. Lots of stuff to clean up in here! You could probably take the feed dogs off if you needed to, but I found it was easy enough to clean from the top and then from the bottom, since you can get in through that side panel door.
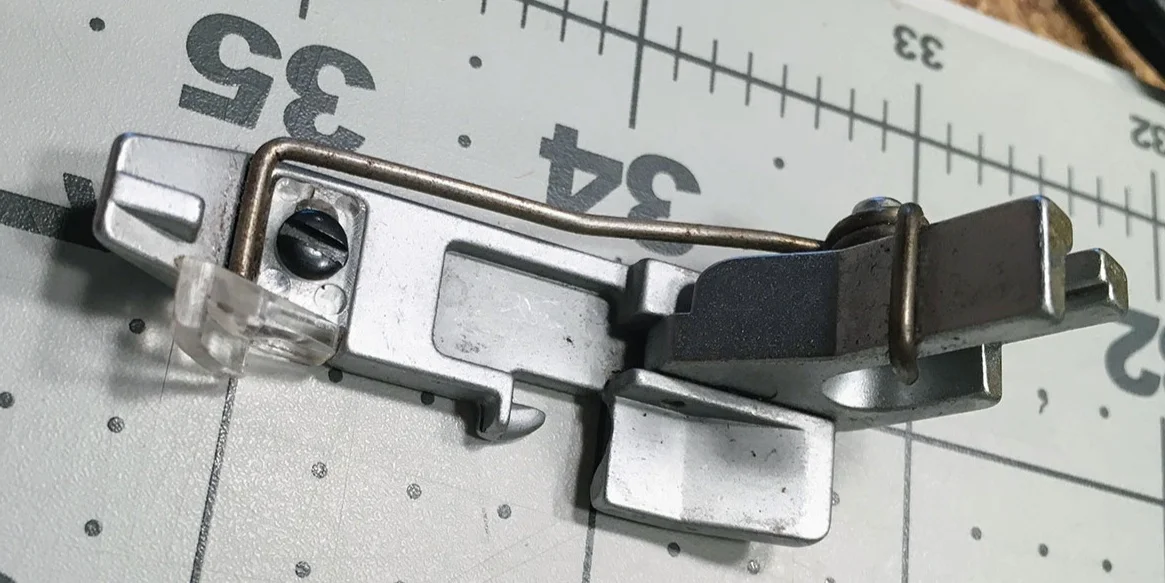
Here’s a close-up of the presser foot, in case you don’t have one or need to find a new one. It’s got a clear plastic “toe” on it. I’m not sure what that’s for.
It helps to move the upper knife out of your way, so you don’t cut yourself while you’re cleaning. Pull the little lever to the right of the knife and then rotate it until it’s pointing upward. Don’t forget to put it back down when you’re ready to use the serger. I do this all the time and then wonder why the fabric isn’t getting trimmed!
The outside of this machine was pretty grungy, so I cleaned it up with water and a little dish soap on a soft cleaning cloth. Don’t forget to “floss” gently between the tension disks to remove any build up. Use a dry, clean cloth for this. You don’t want any moisture getting trapped in there or the tension discs might rust.

Here’s the interior of the serger after cleaning:
And the needle area/feed dogs all cleaned up.
And here’s the front after a good scrubbing.

Oiling
Here’s the oiling guide from the manual. I like to use Zoom Spout sewing machine oil because the extendable spout makes it easy to reach any spot on the machine.
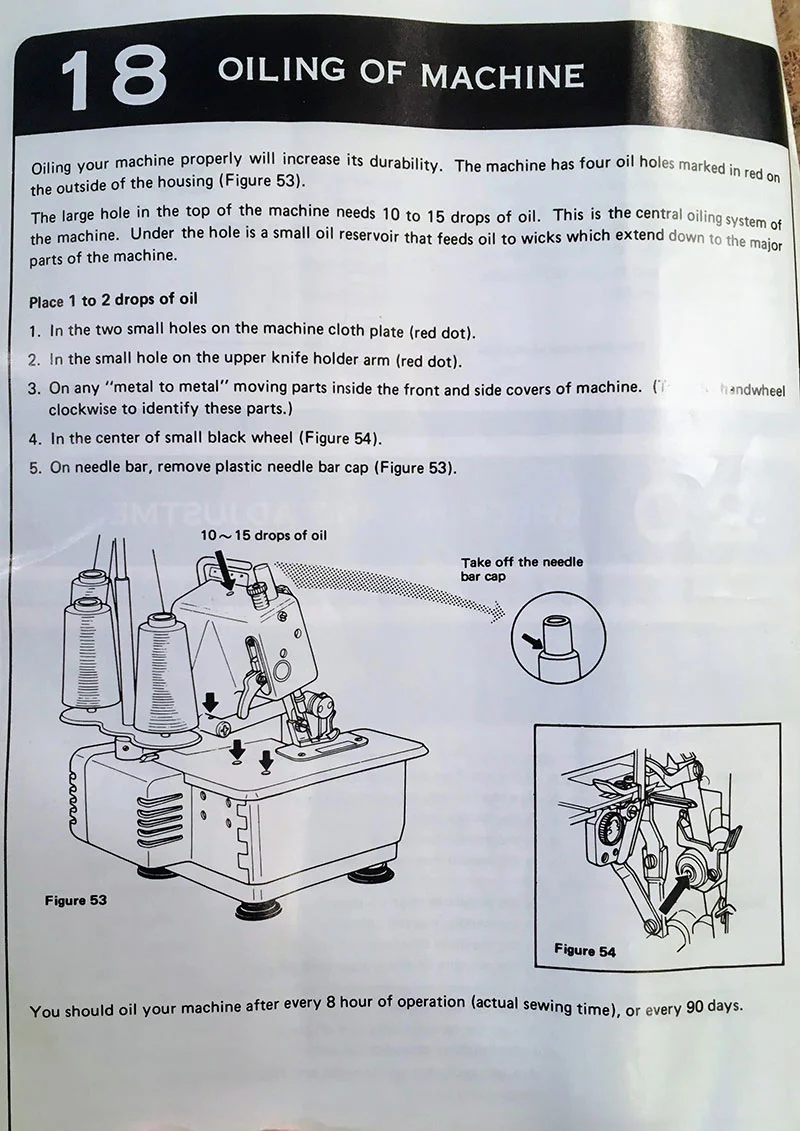
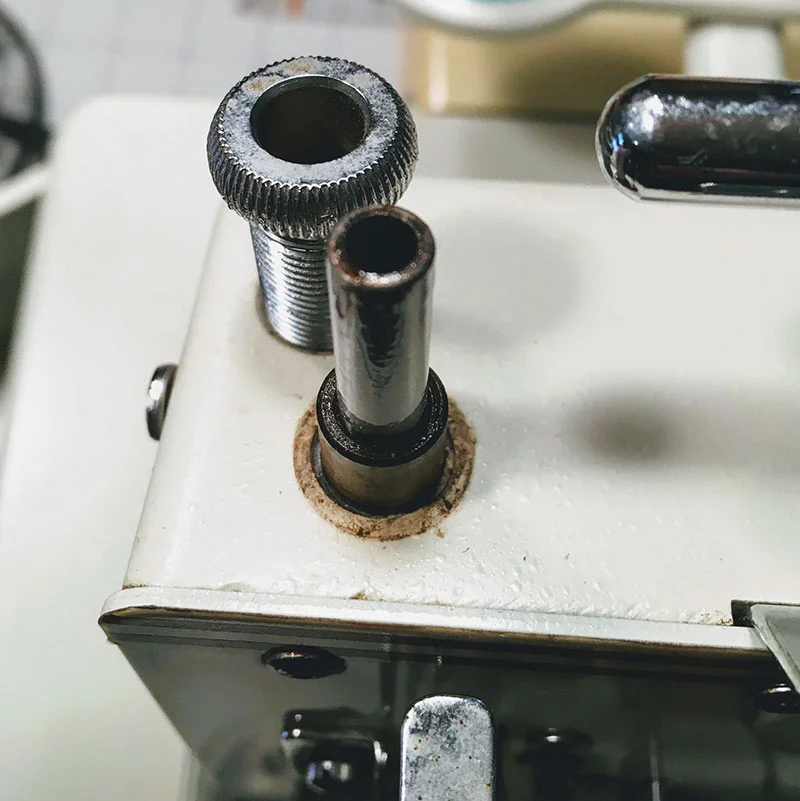
This white cap pulls off to allow you to oil underneath. The manual says to use 10-15 drops of oil. That was the only slightly unusual oiling spot.

Troubleshooting
While I was cleaning, I found this little piece of metal in the bottom of the machine. I thought, hope that’s not anything important.
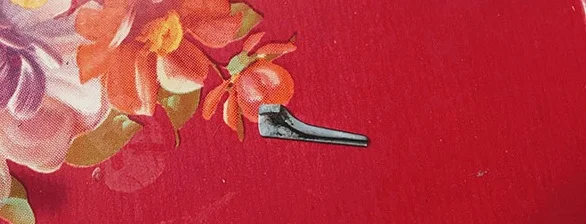
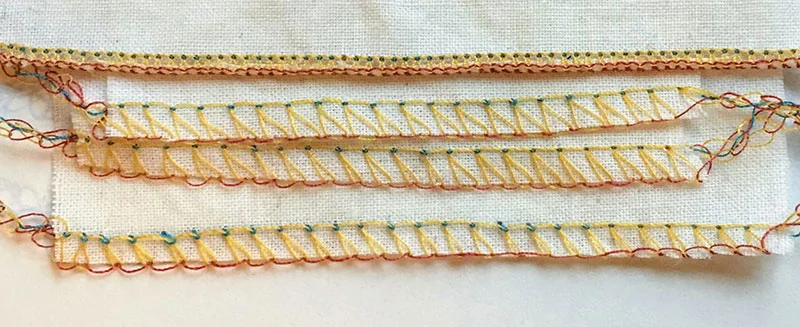
I finished cleaning everything, threaded the machine, and tried it out. It seemed like it was working at first, but then I noticed that the lower looper thread kept breaking. I knew that missing piece was going to be a problem!
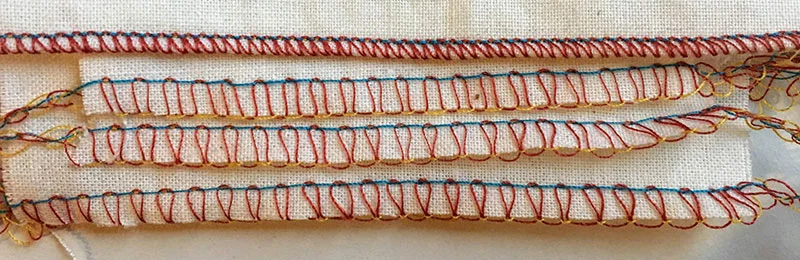
I eventually figured out that the chaining tongue had broken, and I replaced it. The lower two stitch samples are from when I tried to use the machine with the broken chaining tongue. The top sample is from after I replaced the chaining tongue. Night and day!

Let’s go over how I figured out what was wrong and how to replace the chaining tongue. I found one other blogger who had written about this serger, and, as luck would have it, she had the exact same problem I did.
In this post, Karen of Sewing Machine Mavin noted that the Simplicity Easy Lock SL800 makes a beautiful rolled hem, but that she kept breaking the chaining tongue when switching from regular overlock stitch to rolled hem stitch. She noted that she’s broken three of them so far. At the end of the post, she said she’s given up and will only use it for rolled hems.
But wait! In this post, she bought a second Easy Lock serger in order to compare it to the first, and she said you have to get the chaining tongue positioned just right in order to not break it.
However, she doesn’t provide a ton of detail on how to adjust the chaining tongue, other than saying it took some trial and error, so I ended up buying two spare chaining tongues of my own, just in case I broke one in the process. See the section on Finding Replacement Parts below for more information on where to get them.
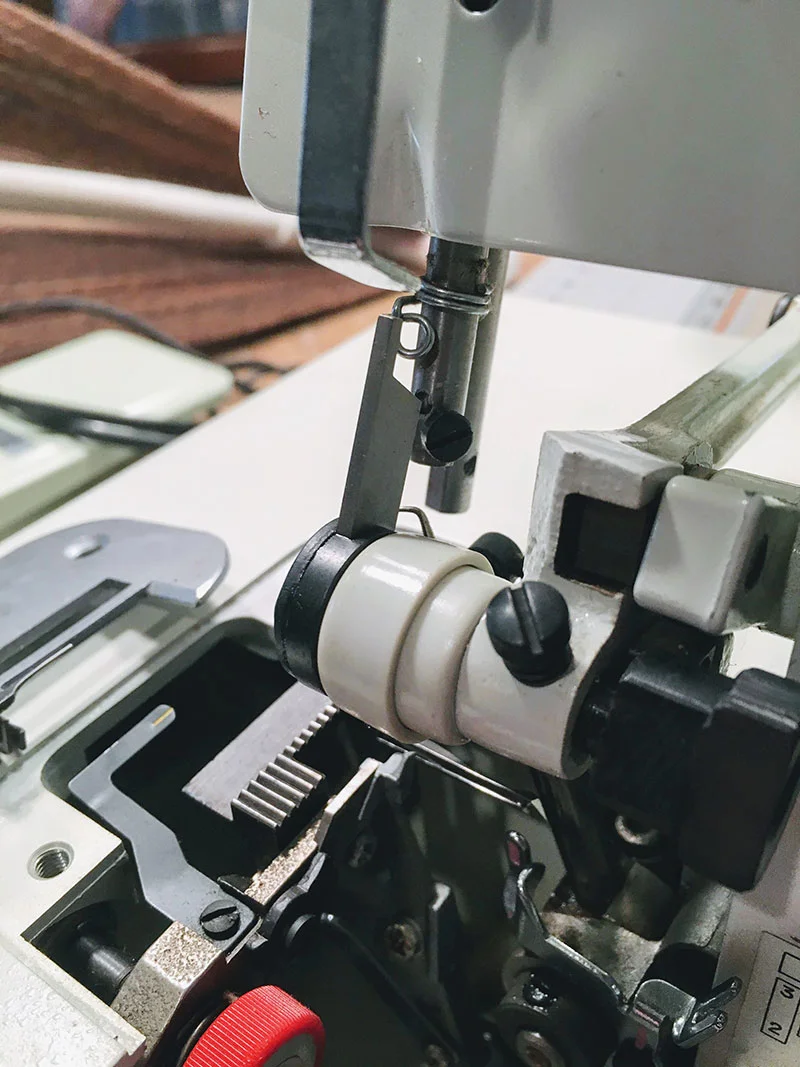
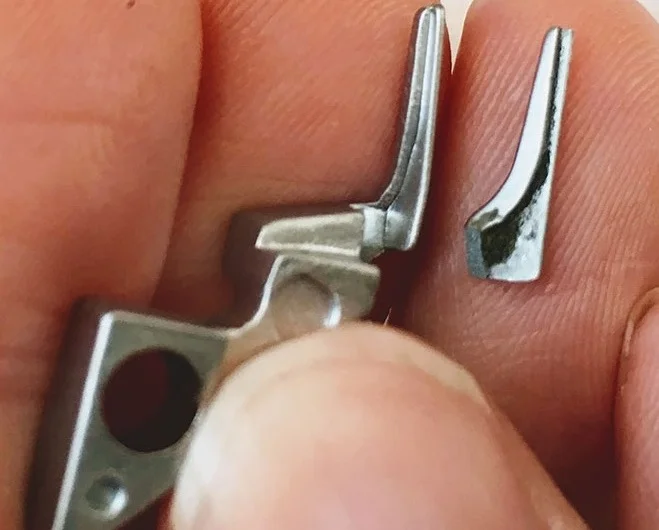
The new chaining tongue I bought seemed slightly thicker than the previous one, but otherwise appeared to be the correct shape and size. See how that little piece matches up with the “toe” on the new chaining tongue?
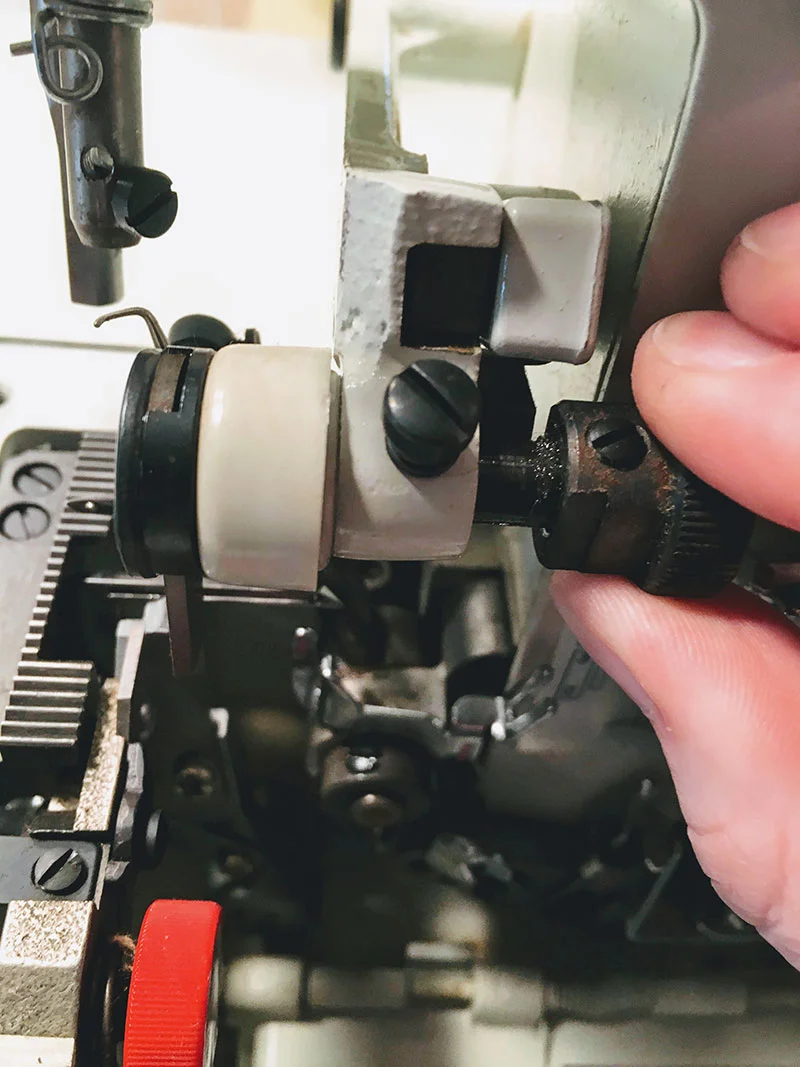
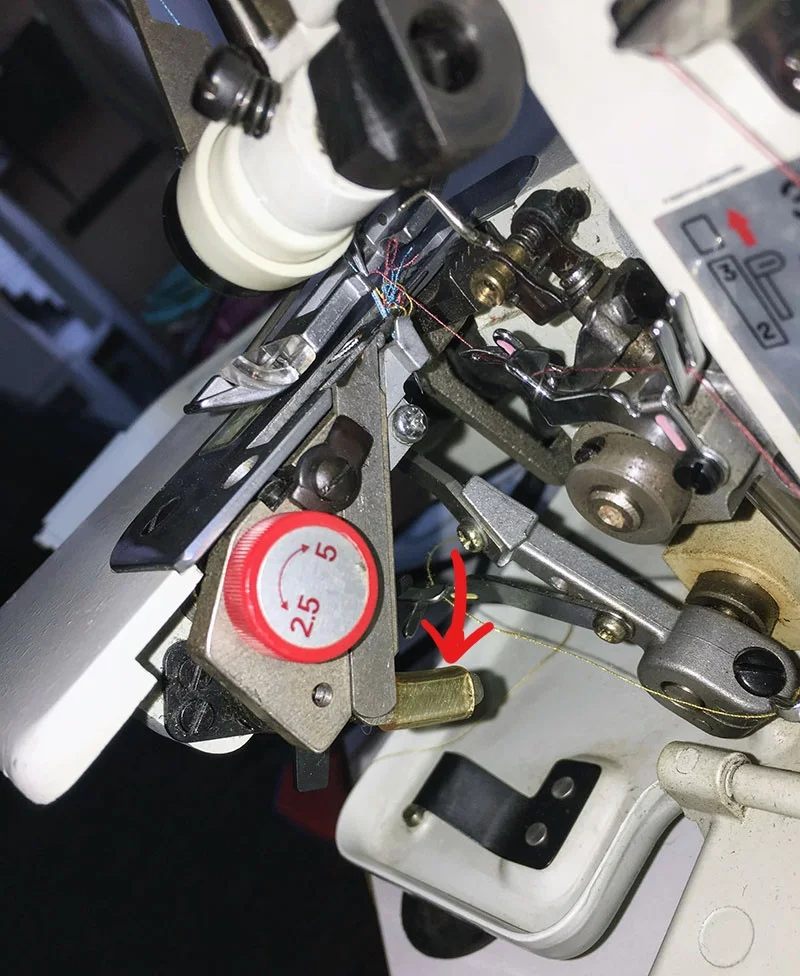
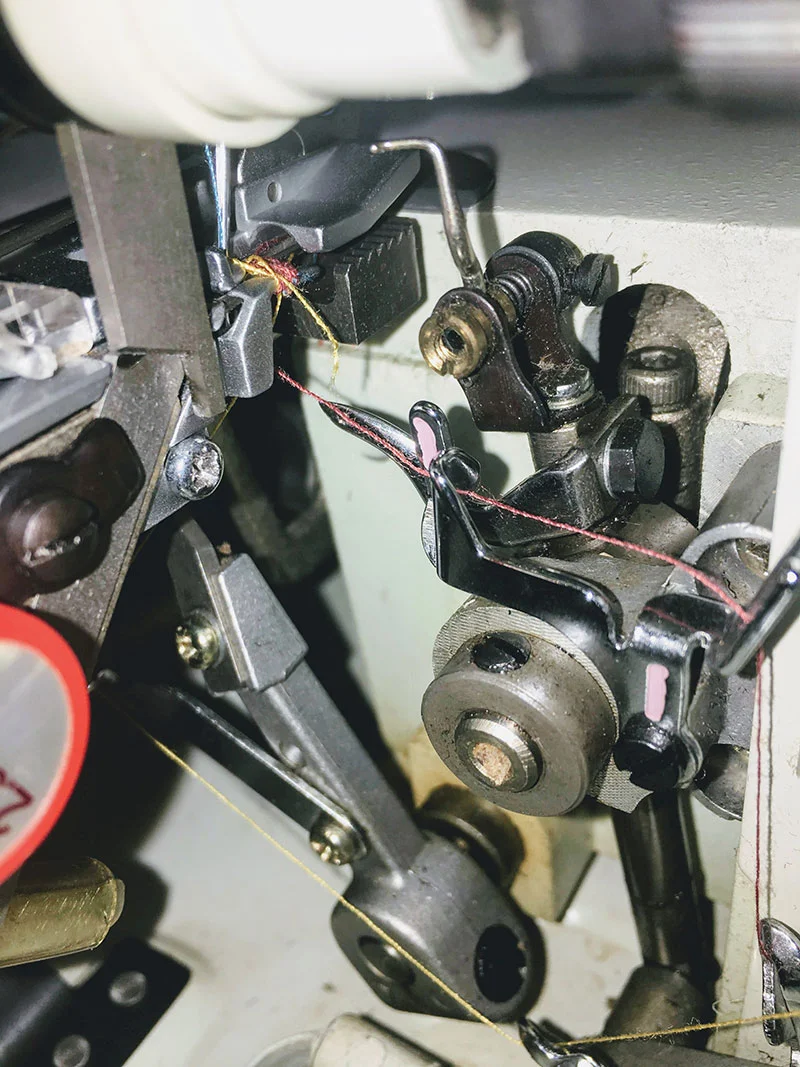
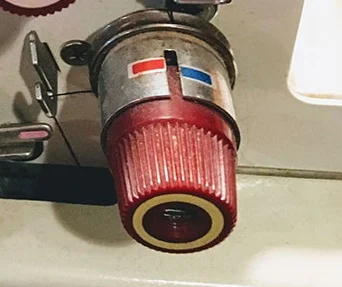
I studied the placement of the broken piece pretty carefully before removing it, so I could try to get it right. The red knob next to the needle plate moves the chaining tongue side to side and the clear plastic section on the needle plate shows the stitch width setting.
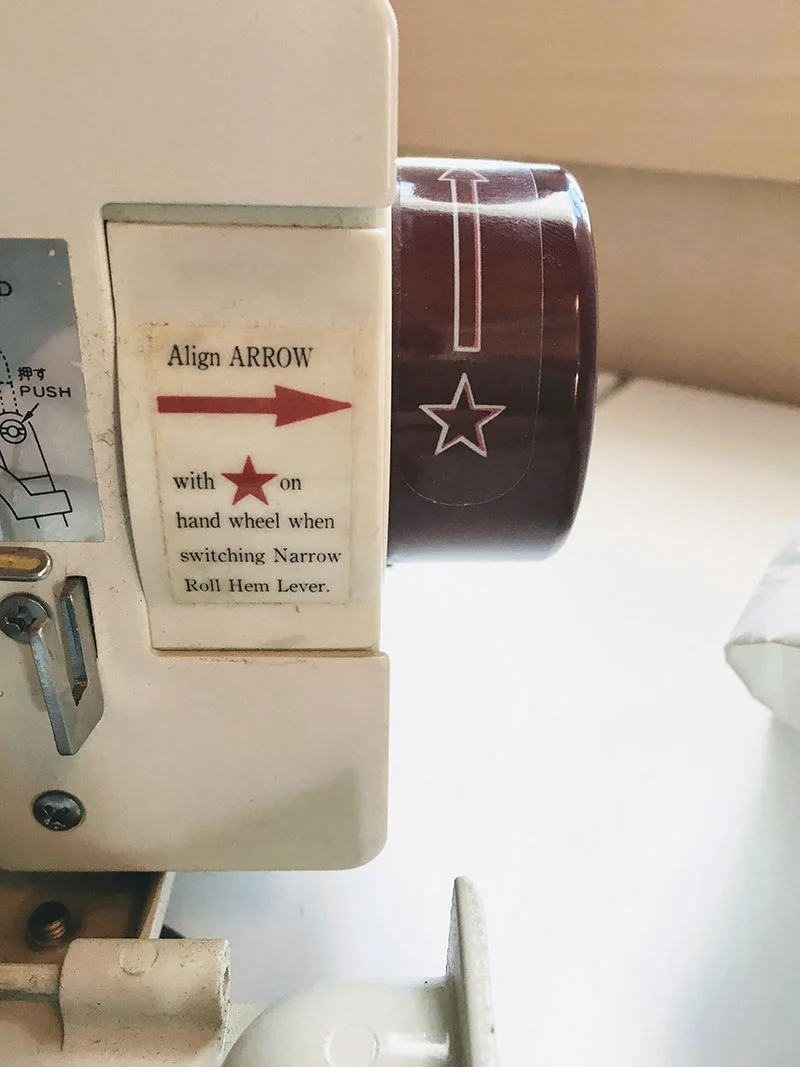
In order to bring the chaining tongue down to remove and replace it, you need to adjust the red knob to the star setting. Then you need to align the arrow and the star on the hand wheel.
There’s a little lever that allows the chaining tongue to be moved out of the way. Pull lever down once you’ve made the adjustments I indicated above with the stitch width indicator and the hand wheel. The lever will not move otherwise. This is also part of the process for switching over to a rolled hem, but for right now, we’re just moving the chaining tongue down to get better access to it.

To remove the chaining tongue, unscrew the nut (right below) on the opposite side of the screw (left below). Don’t lose the small washer underneath the nut. These photos are of the broken chaining tongue before I removed it.

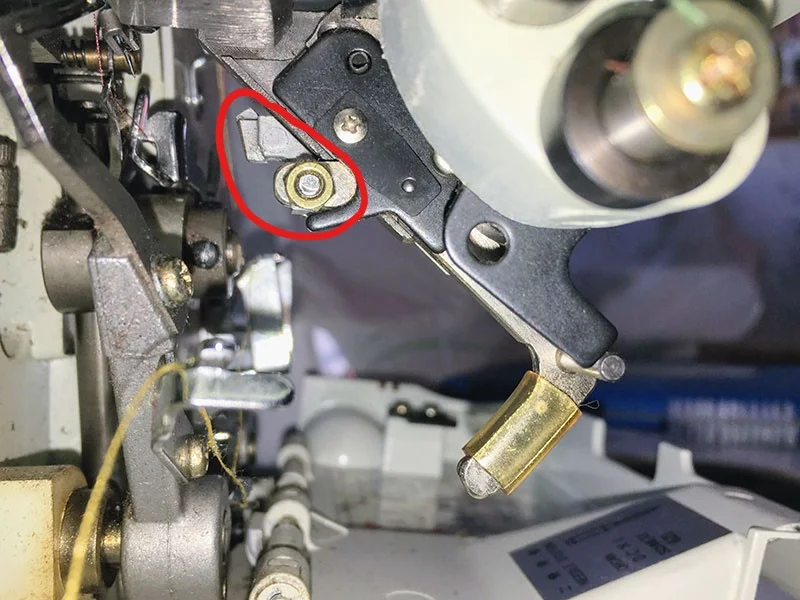
Here are all of the parts involved: the broken chaining tongue, the new chaining tongue, the screw, the washer, and the nut.
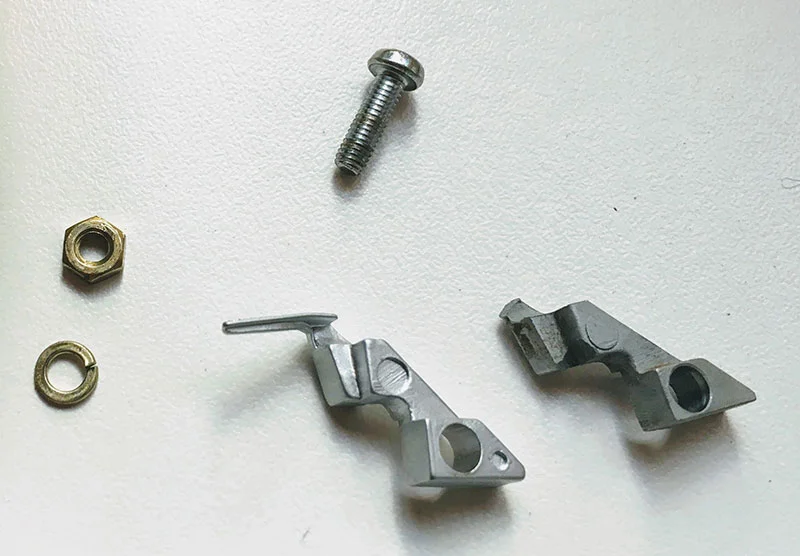
To replace the chaining tongue, hold it in place with your finger, put the screw back in, put the washer on the opposite side, and then screw the nut back on.

At first, I couldn’t move it all the way over to the shortest stitch widths, but after using it for a bit, it started to move more freely. I’m not sure if it just needed to be loosened a smidge, and the vibration of the machine did that or what. Here’s what it looks like in use. The stitches form around this piece when you’re doing a regular overlock stitch.
Finding Replacement Parts
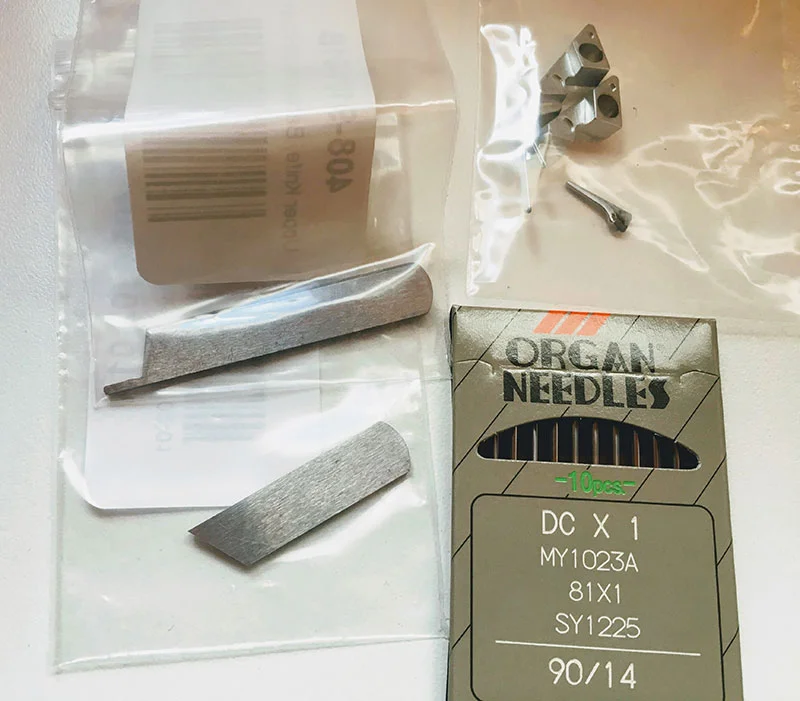
For replacement parts, I like to buy from Sewing Parts Online. They have a handy search option where you can look up compatible parts for your particular machine. Here are all the parts they have that are compatible with the Simplicity Easy Lock SL800. As I mentioned earlier, these are mostly Babylock parts because the same company makes both Simplicity and Babylock machines.
Along with two chaining tongues, I bought more DCX1 needles, and an extra upper knife as well as a lower knife. In my experience, serger knives last a long time, but it never hurts to have replacements on hand, so you don’t have to wait for an order to come in when you need to replace them.
Threading
The sticker inside the side tray is color-coded, so it’s more helpful than the manual for threading. If you’ve ever threaded a serger before, this one is fairly similar to others. I didn’t run into any problems figuring out the threading diagram. As with most sergers, you thread the upper looper (pink) first, the lower looper (yellow) second, and the needle (blue) last.
The only slightly unusual part was that some thread guides underneath the machine just “hold” the thread—it doesn’t always lock into place.

Serging
As you can see from my stitch samples below, this machine does a nice overlock stitch and a nice rolled hem. The pink thread is the upper looper, the yellow thread is the lower looper, and the blue thread is the needle.
Regular Overlock Stitch
I had to play with the tension on my machine to get it right for the regular overlock stitch. Turn knobs to the right for tighter tension and to the left for looser tension. Keep it within the blue rectangle on the tension knob for regular overlock stitch.
After playing around with the settings, I like to start my next round of stitching by using the handwheel for the first few stitches. This will give you a better sense of whether everything is working correctly, and you can stop quickly if something is jammed or not working right. The hand wheel has an arrow pointing toward the back of the machine to show that it should be turned away from you, rather than toward you. On most modern machines, the hand wheel should turn toward you, so that’s a bit unusual.
Rolled Hem
Before changing over to a rolled hem, you need to pull the thread chain off the chaining tongue and then pull down that lever that I mentioned earlier. I think this might be the point at which the chaining tongue broke before. If you forget to pull the threads off the chaining tongue and try to move the lever, that little piece could easily snap off. See the video below for a more in-depth tutorial on switching over to rolled hem stitch.
Flatlock Stitch
I haven’t tried to do a flatlock stich on this machine. Even though the manual doesn’t mention how to do it, I think it would be possible to get a flatlock stitch if you loosen your needle tension quite a bit. See this article on flatlocking from Serger Pepper for more information. I don’t tend to use flatlock stitching on the stuff I make, but I bet you could do it on the Easy Lock if you played around with the settings a bit.
Videos of the Simplicity Easy Lock SL800 in Action
Here’s a video where I show how to adjust the serger from a regular three thread overlock stitch to a rolled hem. I cover some other adjustments, including stitch width, stitch length, and thread tension.
Pros and Cons
I also have a modern Singer ProFinish, which I’ve written about here. As you can see, the Simplicity Easy Lock is more compact, but it’s surprisingly sturdy because of its metal exterior and interior. The ProFinish has plastic case and some plastic parts inside. It gradually shifts around my table while I’m serging, but the Easy Lock stays in place no problem. It serges smoothly and cleanly.

It’s much easier to thread and clean the Easy Lock because there are two doors that you can open to access the internal mechanisms. I have trouble threading the innermost thread guide for the lower looper on my Singer ProFinish because it’s so far under the needle plate, but that’s not a problem at all for the Easy Lock.
I like the sticker on the right side of the presser foot, which you can use to guide the fabric and line it up to cut off a certain amount. I’m not sure if this is standard or if it was added. It would be easy enough to create with a thin strip of masking tape, a pen, and a ruler.

In terms of cons, it doesn’t have a light on it, but that’s not a deal breaker for me. You can always get an external LED light.
The stitch width only decreases to 1 mm, so you can’t get a really dense rolled hem that completely covers the fabric. Again, not a deal breaker for me, since it makes such a lovely rolled hem overall.
The only problem I have run into is that, if you’re trying to serge right along the edge of a fabric without cutting much off, the fabric will sometimes slip behind the knife and not get cut at all. However, if that happens, you can just trim that fabric off afterward.
Where to Buy
Since this is a vintage serger, it’s not easy to find, but you can check out the listings on Ebay for Simplicity Easy Locks. Ebay is probably your best bet, or you can keep an eye out at local shops and on Craigslist and hope for the best.
Free PDF Manual
Here’s a free pdf copy of the manual for the Simplicity Easy Lock SL800 serger.
Want More Information on Sergers?
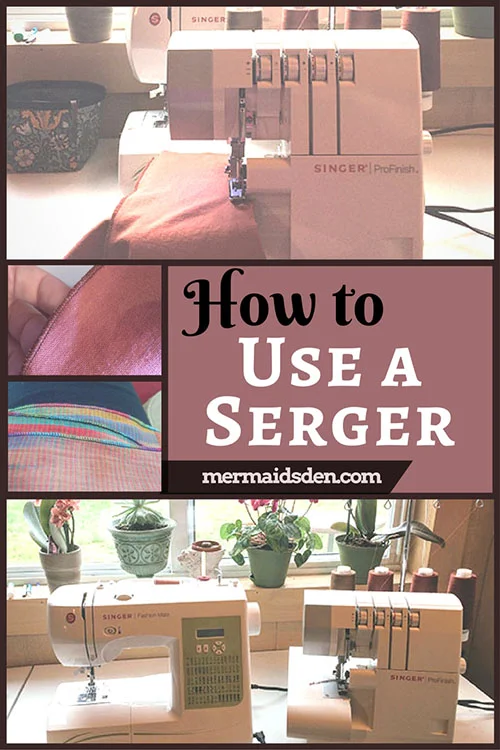
I’ve written a few other posts about sergers, including how to use a serger, my review of the affordable Singer Tiny Serger, and how to use a coverstitch machine, which is a specialized type of serger.
Want More Vintage Sewing Machines?
See my Pinterest board on Sewing Machine Restoration, Repairs, and Reviews:
See also my Pinterest board on Vintage Sewing Machines and Notions.